
I love handlebar bags, but they have issues with how to mount them well. People sure do try everything, and most things work poorly at best. Turns out, like most things, the French had it figured out a long time ago. It’s called the Decaleure. They’re not super well know or popular today because they’re not easy to produce and they aren’t very versatile or inexpensive. But they sure do work wonders at locating your handelbar bag on your front rack! And, keeping it there! And, quick releasing it quickly when you want it off, and not when you don’t!
All that being said, we’re back to them not being very interchangeable or one size fits most. So that’s where custom Decaleures come in. Well also most. There are some great ones out there stock and a lot cheaper than custom, but will they fit your bike or your situation??? I’ve said it many times before and I’ll say it again the Rene Herse Decaleures are probably the best ever made. They have a few different versions for their stems and Nitto stems. If you can make one work for you I say go with them. I’m happy to order it for you and install it. And Cycles Grand Bois ones are also wonderful and beautiful. Tanaka makes a pretty passable one that’s a real problem solver on a budget for many bikes, especially ones on the larger side. I usually stock most of these and would be happy to sell you one too.
If there’s a handlebar bag that lines right up with your stem and Decaleure that’s great! If not there are several good bag makers out there, my two favorites are the great handmade bags stock sizes of bags from Berthoud Cycles or custom made to order bags form Wax Wing Co. Because, sometimes it’s easier to order the bag to fit the bike then make a whole Custom Decaleure and get it painted or chromed. And my sometimes I mean all the time, lol.
But for those other situations where nothing is quite correct, I make Custom Decaleures.
Here are several examples of Custom Decaleures I’ve made over the years.


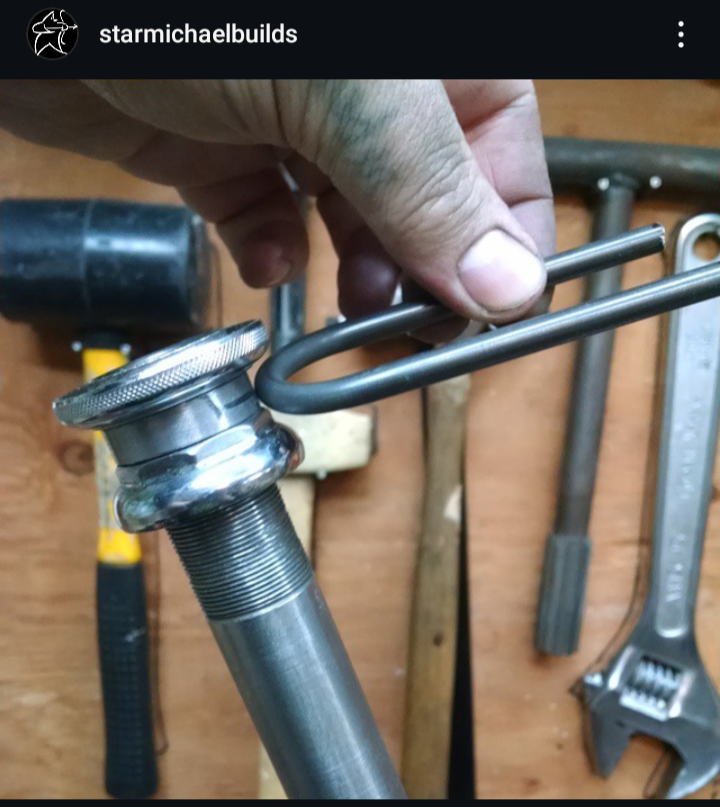
My Custom “Prototype” quick release threadless stem Decaleure! I invented these several years ago for a custom bike we did back in the Norther days. They’re made with a polished stainless steel drilled plate to mount to the bag. It has slotted holes so that the bolts can slide back and forth to fit just about any stem.
The special Custom bolts replace two stem bolts. They originally started life as quick release key chains! On the female side of the key chain I silver in a stainless threaded boss. this lets you bolt it to the Custom polished stainless steel drilled plate that attaches to your bag.
On the male side I drill them out just a little bit to perfectly fit the stem bolt. Then I take two stainless steel M5 bolts, cut the heads off and silver them into the male side of the key chain. I use longer than necessary bolts because they can’t fit flush with many stems and will need small stainless spacers to set them off.
Both sides of the key chain have wrench flats for easy install. The male side is 8mm, and the female side is 10mm.
Please look at the photos cafeully to see what I mean! I have a few of these left in stock. And it’s been at least six years since I made any of these, but can probably do another batch again, someday.
Like with any Decalure these have pluses and minuses. Such as your stem needs to sit level. and your bag must be just the right heigh, about level with your bars.


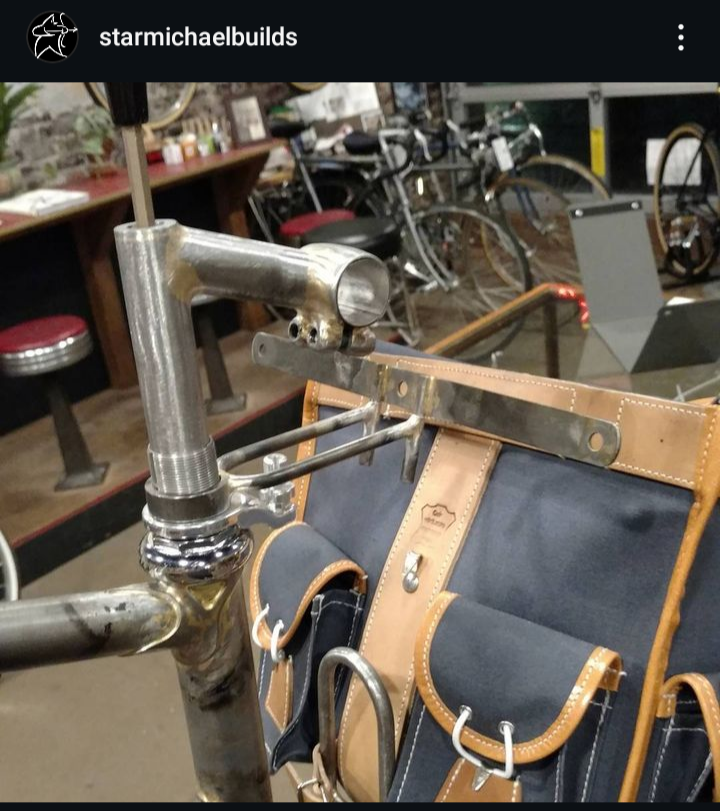
Here we have a similar but more tradition version of the same thing. Classic Decaleure style and function but made for a modern 4 bolt threadless stem.
These can me custom made for any bike. That being said, the bike will need a four bolt stem, the stem needs to sit level. And the stem will most likely need little spacers between the stem face plate and the Decaleure.
Again, please look closely at the pics, and enjoy my custom jig solutions for holding tubes in place for brazing. Modern problems require modern solutions!


Here are some more examples of traditional Decalures. Notice that even though they all have the same basic function and are all similar in many ways, they are all very different too.
The first few examples are I cut a custom headset spacer out of 4130 tube and brazed the Decaleure to that. Most of the rest attach to the stem bolt itself.
Headset mount Decaleures can be made for one inch or inch and an 1/8th steer tubes. For threadless or threaded steer tubes, if you have the room! They can be held in by the headset adjustment itself or have a set screw or binder bolt added.
Notice in most of these examples the Decaleure isn’t coming straight out. They have to bent and stretch to meet the bag where it sits.
Enjoy these build, and pre and post chrome shots, and daydream!
And feel free to look at the Custom racks and stems in the pics too!


Here’s a nice little photo essay of a very tall custom fork that got a custom rack and a fun Custom Decaleure.
The first pick is the bent 1/4 inch .028 wall 4130 chromoly tubing after being bent. Next me drilling out the bag receiver. Then a lay out shot of most of the parts I’ve made so far all cleaned up and about ready to braze!
Next holding parts up, jigging them up and post braze!
Then the final mockup. I believe it’s just polished out and ready for chrome at this stage. This was for a mail order customer, and I never saw them again!